HOW DO I...
…CONNECT THE
EQUIPMENT?
Connect a MIDI cable from the MIDItool MIDI OUT to the Dimmer
Module MIDI IN. Connect the Projector Cable between the MIDItool
(1/4" stereo male plug), the Dimmer Module (polarized Edison
2-prong male plug), and the Projector (Kodak-compatible 7-pin
male plug). One projector cable is required for each projector.
Four projectors can be connected in this manner, using Dimmers
1-4. Up to two additional projectors (lamps only) can be connected
to dimmer channels 5 and 6.
!!WARNING!! -The projectors
MUST be connected to the same AC wall circuit as the Dimmer Module,
as the projectors supply AC power through the Dimmer Module and
back into the projector lamp. Electrovoce suggests placing a warning sticker
on the Dimmer Module's AC cord, and plug the projectors and the
Dimmer Module into the same surge-protected power strip. The MIDItools®'
power supply may be plugged into any circuit.
PLEASE NOTE: The Dimmer
Module supplied with the Quad Projector Controller is specially
modified for this system. The user manual is enclosed, but the
dimmer will not work with regular lamps. You may follow the manual
for setting the MIDI channel and controller numbers.
…SET THE GLOBAL
MIDI RCIEVE CHANNEL?
Press the CHAN key until the desired MIDI receive channel is selected;
the LCD will display the channel. Set the Dimmer Module to the
same MIDI channel and controller numbers.
…TURN ON THE
AUTO ADVANCE FEATURE (AAV)?
Press the AAV key. Each projector will automatically select the
next slide (FORWARD) when its lamp is dimmed to OFF (when its
MIDI controller value = 0). Press the key again to disable the
AAV function. The LCD shows the AAV status, and the AAV status
LED lights when the AAV function is on. The AAV function affects
Dimmers 1-4 only.
…SELECT A SLIDE
CONTROLL RELAY TO CONFIGURE?
Select the relay you want to configure by tapping the PAGE key
until the desired relay is displayed. Relay 1 controls Projector
1 forward motion, Relay 2 controls Projector 1 reverse motion;
Relay 3 controls Projector 2 forward motion, Relay 4 controls
Projector 2 reverse motion; and so on.
…ASSIGN A MIDI
MESSAGE TO EACH RELAY?
Select the desired relay. The MIDI message (Note or Controller)
used to control the selected relay is assigned with the +/- keys
and/or the VALUE fader. For proper operation, each relay should
be assigned a unique message.
…USE MIDI MESSAGES
TO AUTOMATICALLY MOVE THE SLIDES?
A Note On message (with nonzero velocity) or a Controller message
(with value>63) will toggle the relay closed and then open,
changing the slide. The corresponding RELAY STATUS LED lights
while the slide is being moved. The On-Time duration of the relay
pulse can be changed via a SysEx message.
…CONFIGURE
THE DIMMER MODULE?
Press the PAGE key until Dimmer #1 is displayed on the LCD. The
MIDI Controller Number assigned to Dimmer 1 is assigned using
the +/- keys and/or the VALUE fader. Set the Controller Number
for Dimmer 1 on the Dimmer Module to the same number per the Dimmer
Module insstructions. Dimmers 2-6 will respond to consecutive
Controller Numbers automatically. Dimmer 1 controls Projector
1, Dimmer 2 controls Projecor 2, etc.
…USE MIDI MESSAGES
TO AUTOMATICALLY DIM THE LAMPS?
A MIDI Controller message will turn the lamp on to the level specified
by the Controller Value (value=0 turns the lamp OFF; value=127
turns the lamp to maximum intensity). The corresponding DIMMER
STATUS LED (for Projectors 1-4 only) lights while the lamp is
ON.
…SAVE ALL THE
PARAMETERS?
Press the SAVE key. All parameters will be stored in nonvolatile
EEPROM and will be retored on powerup.
…LOCK OUT THE
DISPLAY?
To prevent inadvertant parameter changes, press the LOCK key.
To reallow changes, press it again. While locked, the LOCK STATUS
LED is lit.
…LOAD A DIMMER
CURVE VIA SYSEX?
Press the CAPTURE key. The display is locked out. A System Execlusive
message can be sent with the controller curve "map"
desired. You can also set the relay pulse On-Time. Message format
is:
F0H 7DH V0 V1 V2 …
V126 V127 OT F7H
Where F0H = System
Exclusive status byte
7DH = MIDItools® Sys Ex ID number (educational product)
[all 129 of the following
variables must be supplied in the SysEx message]
V0 = dim value for controller value =0 (0-127, in hex)
V1 = dim value for controller =1 (0-127, in hex)
…
V127 = dim value for controller value =127 (0-127, in hex)
OT = relay pulse On-Time parameter (0-127, in hex)
F7H = End of System
Exclusive byte
You can exit SysEx
load mode by pressing CAPTURE at any time. If the SYSEX OVERLOAD
LED comes on, try slowing down the transmission of SysEx data.
NOTE: when programming a custom dimmer curve, be aware that more
than one "zero" dim value may cause the Auto Advance
feature to behave unpredictably.
…BYPASS THE
DIMMER CURVE?
If your sequencer is rapidly sending large amounts of controller
data, and the MIDItools® unit or Dimmer Module has MIDI data overload,
then you may wish to bypass the MIDItools® dimmer curve. Plug the
MIDI cable to the Dimmer Module from the MIDItools® THRU port,
and set the controller numbers for the dimmers on the MIDItools®
display so they are all different from the controller numbers
set by the DIP switches on the Dimmer Module.
…KNOW IF THERE
IS A MIDI MESSAGE OVERLOAD?
The MIDI OVERLOAD LED will come on. Data may be lost. The MIDItools®
Device may need to be turned off and on again to reset the device.
BUTTONS AND LEDs:
Buttons:
------------ -------------- ---------- -------------
| LOCK | CAPTURE | PAGE | UP |
------------ -------------- ----------- -----------
| CHAN | AAV | SAVE | DOWN |
------------ -------------- ---------- ------------
LEDs:
/-RELAY-\ /-DIM-\
o 1 o 5 o 1 o Lock
o 2 o 6 o 2 o SYSEX OVELOAD
o 3 o 7 o 3 o MIDI OVERLOAD
o 4 o 8 o 4 o AAV
 ^ Back to top ^
LCD Screen:
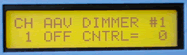
| CH AAV ffffff #n
|
| cc ggg hhhhh=bbb |
ffffff = "RELAY"
or "DIMMER", where n = 1-8
cc = 1-16, ggg = "ON" or "OFF", hhhhh= "CNTRL"
or "NOTE", bbb = 0-127
^ Back to top ^